On Tuesday, October 23, the visual text editor on all Department Web Framework sites will be upgraded to TinyMCE 4. The editing toolbar will have a new look, so editors may have to look twice to find the button they want. This upgrade will improve the overall usability of the editing tools.
Why upgrade?
The newer version of TinyMCE offers many enhancements, including:
- Larger, cleaner, and easier to understand toolbar buttons
- Improved tools for inserting and working with tables
- Improved tools for inserting and working with inline images
What is changing?
The old TinyMCE 3 toolbar looked like this:
![]()
The new TinyMCE 4 toolbar looks like this:

Toolbar Buttons
As you can see, the order and appearance of the buttons are quite different. The new icons are fairly intuitive and probably similar to icons you see in other applications. Here are some of the more significant changes:
| Action | Old Button | New Button |
|---|---|---|
| Insert link | ||
| Insert anchor/bookmark (shortcut target) | ||
| Insert table | ||
| Remove formatting | ||
| Edit image | ||
| Switch to code view | ||
| Browse files (in link dialog) |
Editing Tables
The tools for working with tables are easier to use. There are fewer buttons on the toolbar and fewer options in the dialog boxes. The options in the related menus are more intuitive.
 To insert a table:
- Click on the "Table" button to reveal the table dropdown.
- Use the flyout on the first item in the menu to indicate the size of the table: 2x5, 3x10, etc.
- After the table has been inserted, click anywhere in it and you will see buttons nearby for inserting or removing rows and columns.
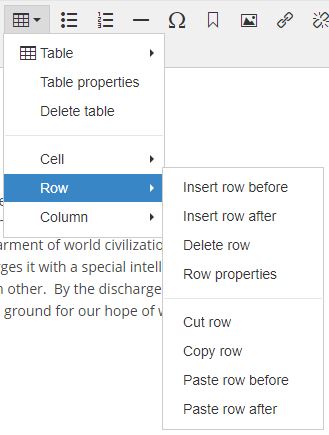
To apply header styling to the first table row:
- Click in any of the cells in the first table row.
- Click on the "Table" button. In the dropdown menu, go to the item "Row > Row properties."
- In the dialog box, change "Row type" to "HEADER."
- Click "OK."
Editing Inline Images
The tools for working with inline images are also easier to use. After you upload and insert an image from the extra images tab, you can customize it more easily:
- Alignment - Select the image, then click on one of the alignment buttons in the main toolbar (left, right, or center). With the left or right options, text will wrap around the image.
- Padding/whitespace - Select the image and click on the "Insert/Edit Image" button. In the dialog box that pops up, go to the "Advanced" tab, and enter CSS rules in the "Style" field. Adding "margin: 10px" will add 10 pixels of spacing around the entire image. Adding "margin-left: 10px" will add 10 pixels of spacing on the left side. Separate multiple rules with semicolons.
- Customize alt text - In the "Insert/Edit Image" dialog, change the "Image description." Alt text should always be provided for accessibility.
Questions?
If you have any questions about the new buttons or cannot figure out how to do something, please ask our team at asweb@uw.edu.
We hope after a brief adjustment period, everyone will love using the new editor!